


As a website owner, you probably understand the importance of website speed and page loading time.
How quickly your website is available to visitors influences bounce rate, user experience, placement in search results (since speed is a ranking factor) and much more.
In fact, loading speed is so important that a while ago, we published an entire article on that topic.
One of the most effective ways to make your site load faster is with Gzip compression, which is also sometimes called HTTP or browser compression.
If you work with a computer regularly, you probably already know about compression from zip archives. It’s a great way to reduce file size in order to make them easier to transfer.
The same is possible for the files that make up your WordPress website and there are good reasons to do so.
Smaller files will allow your visitors to download them faster and see your site quicker.
Not only does this improve the user experience and makes you site more attractive to search engines but it also results in less server load and bandwidth usage, which is a good thing for performance-based hosting packages.
Reason enough to look at this topic in detail, don’t you think?
Me too. Therefore, in this article, I will show you several ways to enable Gzip compression for your WordPress website so that it can be as fast as it deserves to be.
How Does Gzip Compression Work?
Before we dive into how to implement compression, let’s have a quick look at how it actually works.
Basic Website Architecture
As you probably know, most modern websites consist of a mix of HTML, CSS, and JavaScript, which — on the very basic level — are nothing but text files.
When visitors request to see you site, their browsers download these files and render your site from the code contained within.
So far, so good.
However, because the code is usually handled by humans, it is arranged in a way that makes it easy to understand for human eyes.
It’s one of the many reasons why we have WordPress coding standards.
However, machines like your browser don’t need code to be pretty or legible. As long as they can parse it, it can be written in one block or line for all they care.
That’s the reason why a good way to make website’s load faster are code concatenation and minification.
These words mean nothing else than taking away all the formatting that is purely there to make code more legible for people, like comments, line breaks, spaces, and such.
Enter Compression
Doing so can already reduce file size by quite a bit, yet, compression takes this even further.
In order to understand how it works, we have to understand that all code is at least somewhat repetitive.
It’s simply in the nature of programming and web design to have lots of recurring patterns and elements.
Compression algorithms like Gzip take advantage of this fact by replacing repetitive patterns with a sort of shorthand.
To make this clear, let’s pretend we have a piece of code that looks like this:
AAA BBBB CCCCC
With a simple system we can shorten the same code to this:
3A 4B 5C
Easy to understand, right? I just shortened the recurring characters by representing how often they appear with numbers.
It’s simple and if you know the system, you can easily reprocess this back into the original line later on.
However, what’s also remarkable is that this small step reduced our code from twelve characters to merely six, which is a reduction of 50 percent.
While that’s not actually how Gzip works, the idea behind it is very similar if much more complex.
However, on the very basic level, Gzip is nothing but a library for compressing and decompressing data and it works especially well for text-based content like lines of code.
In fact, the algorithm can reduce the size of HTML, CSS, and JavaScript files by as much as 70 to 90 percent.
Since all modern browsers not only support Gzip but will actually request it automatically, this makes compression a fool-proof method to speed up your WordPress website.
A Practical Example
To show you what that means in real life, for this article I have equipped one of my own websites with Gzip compression that was uncompressed before.
Here is what the situation looked like in the beginning:

And here is what I found afterwards:

As you can see, enabling Gzip for my WordPress site reduced the file size from 550KB to 343KB and shaved off half a second in loading time (that’s huge in Internet terms!).
Sure, there is a lot more to do but this is not bad for one simple change, right? Now let me show you how you can take advantage of this as well.
How To Enable Gzip Compression For WordPress Websites
First off, you need to understand that compression is not handled by WordPress itself but rather by something that happens on the server.
Therefore, this feature is not typically set up with a plugin but through a server configuration file (though you will see that here are plugin options as well).
This leaves us with the following options for adding Gzip compression to our WordPress websites.
Have Your Host Set It Up
As I said, the most common way to enable Gzip compression is through a sensitive server file called .htaccess and below I will show you how to do it manually.
However, if you feel uncomfortable implementing this yourself, you might be better off talking to your host instead.
Especially if you work with a quality hosting company, they might offer Gzip compression as part of their standard service or have it already set up.
Therefore, before you start making any changes, it may be a good idea to give them a call either way.
Alternatively, you can also use the aptly named Check GZIP Compression website to see if compression is active for your website before continuing.

If it’s not and you want to take care of it yourself, move on to the steps below. Don’t worry, it’s far from being rocket science.
Use A Plugin
WordPress wouldn’t be WordPress if there wasn’t some sort of plugin solution out there to set up Gzip compression.
One of them is Check and Enable Gzip Compression, which is built for exactly this purpose.
However, the plugin has very mixed reviews and ratings and may not be the best option. Yet, don’t despair, we have other alternatives.
Number one is the caching plugin W3 Total Cache. Under the Browser Cache settings, you can find a check box to add HTTP compression to your WordPress website.

Don’t forget to save your settings after enabling it!
Another plugin option is its competitor WP Super Cache. If you have it installed, you can find an option to Compress pages so they’re served more quickly to visitors under Advanced.

Check it, save, and you have Gzip enabled on your site.
Finally, a third (premium) caching plugin named WP Rocket not only gets a lot of good press but also comes with compression built in.
As you can see, there are plenty of plugins to choose from.
However, even if you don’t opt for any of them, you can still enable Gzip compression for your WordPress site by hand.
Enabling Gzip Compression Via .htaccess
Setting up compression directly on the server has several benefits.
For one, plugins come with a lot of data overhead which increases the risk of conflicts with other plugins and errors.
Plus, if compression is all you are looking for, installing a large plugin with dozens of other functions doesn’t make sense.
As mentioned earlier, the server file responsible for enabling this features is called.htaccess (yes, including the dot).
It is used for implementing special instructions to the server.
For example, when you set up pretty permalinks in WordPress, the CMS adds rewrite rules to .htaccess in order to make this happen.
Other things this file can do are redirects, protecting files and folders from access andmuch more including Gzip compression.
Here’s how to do the latter.
Find And Edit .htaccess
To make any changes to our file, we first need to find it. That’s not always easy, because it is hidden by default.
The easiest way to access .htacces is via FTP but you can also use cPanel or any other admin interface.
In our case, we will start by opening our FTP client and connecting it to the server.
.htaccess is usually found in the root directory of your website. However, as I mentioned, it is most often invisible.
In FileZilla, you can change this under Server > Force showing hidden files.

However, your mode of access might have the option somewhere else.
After that, you can edit the file like any other. In Filezilla this means right-click and thenView/Edit.

Alternatively, you may also download .htaccess to your computer and make changes on your hard drive.
In fact, you should probably do that anyway in order to have a backup in place (safety first!).
If you go the download route, be aware that your operating system might also be hiding the file and you won’t see it unless you change your display options.
In Windows 7, these can be found under Folder and search Options. In that menu, find the View panel and then Show hidden files, folders, and drives.

Check this and hit OK to save.
Mac users can refer to these instructions to download and edit .htaccess.
Add The Necessary Code
Overall, enabling Gzip compression is not that challenging. All it takes is adding the following piece of code to the .htaccess file (thanks to GTmetrix!):
|
1
2
3
4
5
6
7
8
9
10
11
12
13
14
15
16
17
18
19
20
21
22
23
24
25
26
27
28
29
30
|
<IfModule mod_deflate.c>
# Compress HTML, CSS, JavaScript, Text, XML and fonts
AddOutputFilterByType DEFLATE application/javascript
AddOutputFilterByType DEFLATE application/rss+xml
AddOutputFilterByType DEFLATE application/vnd.ms–fontobject
AddOutputFilterByType DEFLATE application/x–font
AddOutputFilterByType DEFLATE application/x–font–opentype
AddOutputFilterByType DEFLATE application/x–font–otf
AddOutputFilterByType DEFLATE application/x–font–truetype
AddOutputFilterByType DEFLATE application/x–font–ttf
AddOutputFilterByType DEFLATE application/x–javascript
AddOutputFilterByType DEFLATE application/xhtml+xml
AddOutputFilterByType DEFLATE application/xml
AddOutputFilterByType DEFLATE font/opentype
AddOutputFilterByType DEFLATE font/otf
AddOutputFilterByType DEFLATE font/ttf
AddOutputFilterByType DEFLATE image/svg+xml
AddOutputFilterByType DEFLATE image/x–icon
AddOutputFilterByType DEFLATE text/css
AddOutputFilterByType DEFLATE text/html
AddOutputFilterByType DEFLATE text/javascript
AddOutputFilterByType DEFLATE text/plain
AddOutputFilterByType DEFLATE text/xml
# Remove browser bugs (only needed for really old browsers)
BrowserMatch ^Mozilla/4 gzip–only–text/html
BrowserMatch ^Mozilla/4.0[678] no–gzip
BrowserMatch bMSIE !no–gzip !gzip–only–text/html
Header append Vary User–Agent
</IfModule>
|
It doesn’t matter whether you place the code inside or outside the # BEGIN WordPressand # END WordPress brackets, it will work either way.
In case you have problems with the code above (I will show you how to find out if Gzip is working in a second), you can also use this alternative (both worked for my site):
|
1
2
3
4
5
6
7
8
9
10
11
12
13
14
15
16
|
AddOutputFilterByType DEFLATE text/plain
AddOutputFilterByType DEFLATE text/html
AddOutputFilterByType DEFLATE text/xml
AddOutputFilterByType DEFLATE text/css
AddOutputFilterByType DEFLATE application/xml
AddOutputFilterByType DEFLATE application/xhtml+xml
AddOutputFilterByType DEFLATE application/rss+xml
AddOutputFilterByType DEFLATE application/javascript
AddOutputFilterByType DEFLATE application/x–javascript
AddType x–font/otf .otf
AddType x–font/ttf .ttf
AddType x–font/eot .eot
AddType x–font/woff .woff
AddType image/x–icon .ico
AddType image/png .png
AddType text/css .css
|
That’s pretty much all it takes. Save and upload your file and Gzip should be ready. However, in order to be sure, let’s verify it’s actually doing its job.
Verify Gzip Compression Is Working
Besides the aforementioned Check GZIP Compression, we have several other tools at our disposal to make sure the change has taken effect:
- Google PageSpeed Insights
- GTmetrix
- WhatsMyIP
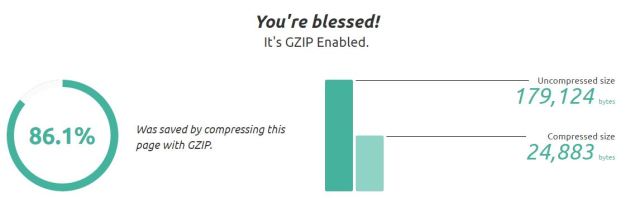
In all three cases, all you need to do is input your URL and run the tool. After that, each one will tell you whether Gzip is active on your site or not like so:

However, the hint will show up in different places:
- PageSpeed Insights — Check under Passed Rules (if it didn’t work, you will also get a recommendation to activate compression further up).
- GTmetrix — Find the hint about Gzip compression in the PageSpeed column.
- WhatsMyIP — Will tell you right on the page.
If you don’t see a change right away, it doesn’t necessarily mean you made a mistake. It might just take some time for the compression to take effect (especially with larger sites) or for the site cache to be updated.
If everything works, congratulations! You just took a big step in speeding up your WordPress website.
Gzip Compression For WordPress in a Nutshell
It should not be underestimated how much your site’s load speed can affect its popularity among visitors and search engines.
Page loading speed has become more and more a sign of quality and smart website owners do their best to make their WordPress websites as fast as possible.
While there are many ways to speed up your WordPress website, Gzip compression is a simple yet effective tool that can make a huge difference.
Aside from that, it is also easy to implement so there is no excuse not to take advantage of it. Your visitors and Google will both thank you.